

Creating a NextJS Blog with Notion
Creation Date
Jun 21, 2021
Tags
NextJS
React
Notion
Introduction
My personal website (https://www.kleveland.dev/ still may be a WIP 🤞) that hosts both my blog content and my projects is actually sourcing its data from my Notion pages. This means when I want to create a new blog entry or add a new project to my personal website, I can simply go and edit my Notion table to add a new page or update an existing page. How might this be done? It utilizes this awesome React library called NotionX:
Tech Used
- NextJS (React)
- NotionX
- Vercel (deployment)
NotionX
NotionX does its best to emulate your notion pages with the added benefit of keeping great lighthouse scores and doing its job very well. How does this work? It takes in mostly just one required prop to work out of the box: a RecordMap.
How it Comes Together
NotionX's github page has some good walkthroughs of how to use this and it does a good job of explaining everything however it took me some time to find some additional resources that better describe and show how everything comes together. Travis Fischer created this and also has it website served up using it. You can use his starter kit here if you want something out of the box:
You can also see what this starter kit looks like as well as read more about notionX (it looks awesome!) via his website:
https://transitivebullsh.it/nextjs-notion-starter-kit
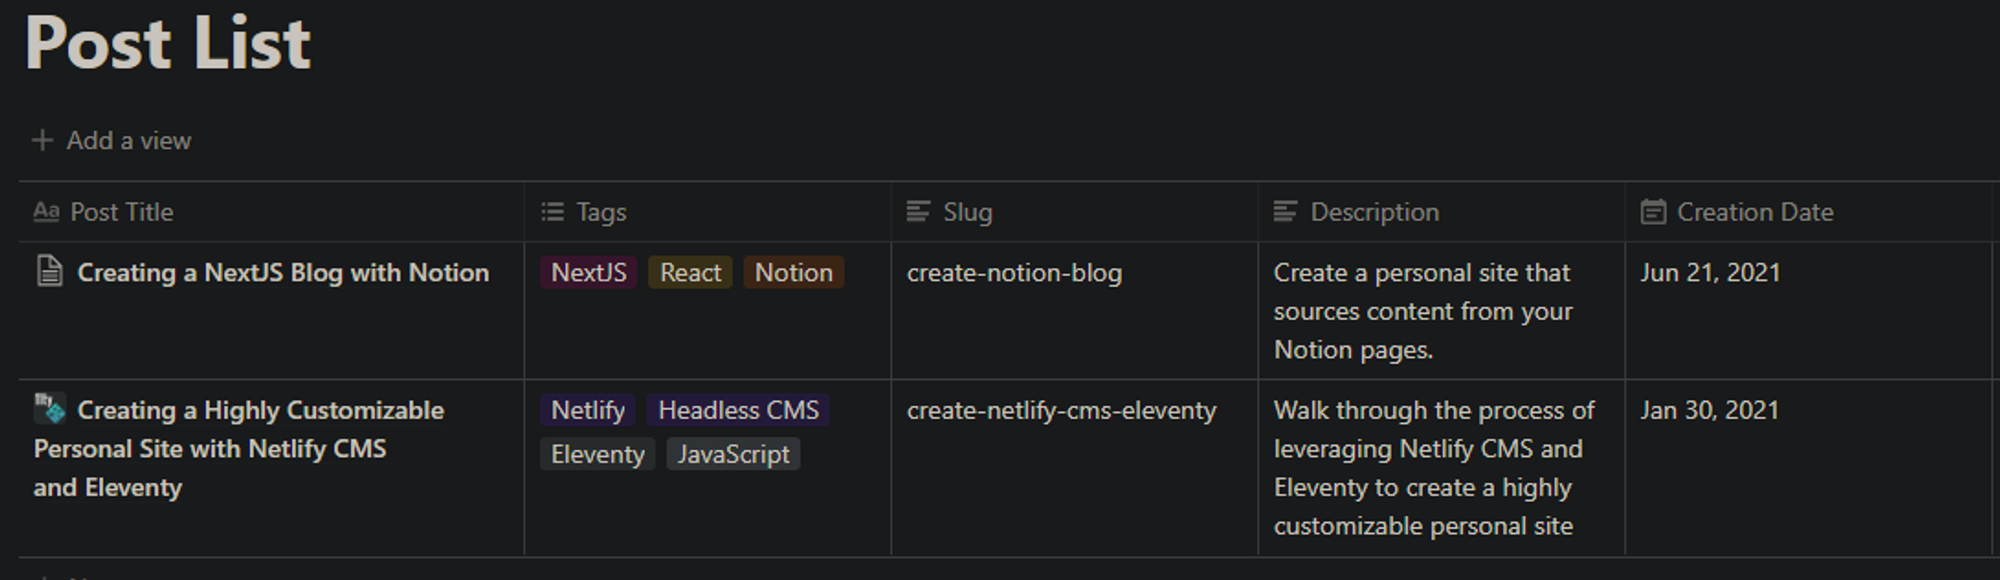
Creating a Database to Source Posts
If you decide to use the nextjs-notion-starter-kit above, most things are done for you. However, for more customizability, we will go through what can be done to implement something similar to the nextjs-notion-starter-kit. You can actually create a database like this on your notion page
Once created, we can create a post retrieval api that will pass in the RecordMap to our react component which we can pass to NotionRenderer.
import axios from "axios";

const PAGE_ENDPOINT: string =
  "https://www.notion.so/api/v3/loadPageChunk";

export default async (pageId: string) => {
  const result: any = await axios.post(PAGE_ENDPOINT, {
    chunkNumber: 0,
    cursor: { stack: [] },
    limit: 100, // This can be increased as needed but this seems to work ok
    page: {
      id: pageId
    },
    verticalColumns: false,
  });

  return result.data;
};
Github Action
One of the things that you can use in NotionX is its library to make these requests yourself. However, I believe it is better to retrieve a list of posts and cache it on each deploy. I decided to use a Github Action to do this (make sure to replace COLLECTION_ID_HERE and COLLECTION_VIEW_ID)
name: Cache Post List and Rebuild
on:

  repository_dispatch:
    types: [ build ]
  # Allows you to run this workflow manually from the Actions tab
  workflow_dispatch:
jobs:
  build:
    runs-on: ubuntu-latest
    steps:
      - uses: actions/checkout@v2
      - name: Fetch API Data 📦
        uses: JamesIves/fetch-api-data-action@releases/v1
        with:
          ENDPOINT: https://www.notion.so/api/v3/queryCollection
          CONFIGURATION: '{ "method": "POST", "headers": { "content-type": "application/json" }, "body": { "collectionId": "COLLECTION_ID_HERE", "collectionViewId": "COLLECTION_VIEW_ID", "loader": { "type": "reducer", "reducers": { "collection_group_results": { "type": "results", "limit": 50 }, "table:title:count": { "type": "aggregation", "aggregation": { "property": "title", "aggregator": "count" } } }, "searchQuery": "", "userTimeZone": "America/New_York" }, "query": {} } }'

      - name: Store Data in _posts/data.json 🚀
        uses: JamesIves/github-pages-deploy-action@4.1.4
        with:
          branch: main # Pushes the updates to the master branch.
          folder: fetch-api-data-action # The location of the data.json file saved by the Fetch API Data action.
          target-folder: _posts # Saves the data into the 'data' directory on the master branch.
      - name: Build and Deploy
        uses: amondnet/vercel-action@v20
        with:
          vercel-token: ${{ secrets.VERCEL_TOKEN }} # Required
          vercel-args: '--prod' #Optional
          vercel-org-id: ${{ secrets.VERCEL_ORG_ID}}  #Required
          vercel-project-id: ${{ secrets.VERCEL_PROJECT_ID}} #Required
This action file will essentially cache to _posts/data.json the database entries and the IDs to point to for all our blog posts. It can then be imported and read from in our NextJS App. I created a API endpoint to retrieve a list of posts and formatted them into my own format to read from as React props
const COLLECTION_ID: string = "COLLECTION_ID_HERE";

export default (pageList: any) => {
  const data = pageList.recordMap;
  const schemaMap = data.collection[COLLECTION_ID].value.schema;
  const entries = Object.entries(data.block).filter((entry: any) => entry[1].value.properties).map((entry: any) => {

    const newEntry:any = {
          id: entry[0],
          title: entry[1].value.properties.title[0][0],
          imageLink: entry[1].value.format ? `https://www.notion.so/image/${encodeURIComponent(entry[1].value.format?.page_icon)}?table=block&id=${entry[0]}&cache=v2` : '/post_images/empty_image.svg'
      };
      Object.keys(entry[1].value.properties).forEach((key: string) => {
        const schema = schemaMap[key];
        if (schema.type === 'text')
            newEntry[schemaMap[key].name] = entry[1].value.properties[key][0][0];
        else if (schema.type === 'multi_select')
            newEntry[schemaMap[key].name] = entry[1].value.properties[key][0][0].split(',');
        else if (schema.type === 'date')
            newEntry[schemaMap[key].name] = formatDate(entry[1].value.properties[key][0][1][0][1].start_date);
      });
      return newEntry;
  });

  return entries;
};

const months = [
    'Jan',
    'Feb',
    'Mar',
    'Apr',
    'May',
    'Jun',
    'Jul',
    'Aug',
    'Sep',
    'Oct',
    'Nov',
    'Dec'
  ];

const formatDate = (input: string) => {
    const date = new Date(input)
    const month = date.getMonth()
    return `${months[month]} ${date.getDate()}, ${date.getFullYear()}`
}
Combining Everything
Utilizing the created functions above, we can source our static props and create our static paths from the 'slug' we specified in our Notion table and pass in the recordMap for each page via getStaticProps to render each NotionPage.
import pageList from "../../_posts/data.json";
import getPostList from "../api/post-list";
import getPost from "../api/post";

export const getStaticProps = async (context: any) => {
  const mappedList = getPostList(pageList);
  const foundPost = mappedList.find(
    (entry: any) => entry["Slug"] === context.params["slug"]
  );
  if (!foundPost)
    return {
      props: {},
      revalidate: 10,
    };
  const results = await getPost(foundPost.id);
const recordMap = results.recordMap;
	return {
	    props: {
	      recordMap
	    },
	    revalidate: 10
	  };
}

export async function getStaticPaths() {

  const results = getPostList(pageList);
  const mappedSlugs = results.map((entry: any) => ({
    params: { slug: entry["Slug"] },
  }));

  return {
    paths: mappedSlugs,
    fallback: true,
  };
}
Passing RecordMap to NotionRenderer
It is a simple as the following code snippet however keep in mind you will probably have additional props and additional customizations that will result in it not being this simple.
function NotionPage({ recordMap }: { recordMap: ExtendedRecordMap }) {
	return <NotionRenderer recordMap={recordMap} />
}
What else?
There are somethings I did not cover in this for the sake of this post being lengthy but you can extract information as needed from the RecordMap and parse it yourself some more. I did this for things like retrieving the images from Notion and also for retrieving Table of Contents data. NotionX also has supporting utility functions to handle parsing a lot of this information as well. I recommend exploring NotionX some more and look around in Travis Fischer's personal NextJS template for some inspiration too.
Thanks for Reading!
Loading...